Showing posts with label Burlap. Show all posts

Monday, September 16, 2013

The Evolving Personalized Picture

I need to start by saying that right at this minute there's a mouse living in my kitchen and I don't have any mouse traps. When we spotted our first (enormous) black snake this summer after moving in and I demanded its death and hubs said "no, they're helpful," he asked me if I want snakes or mice. His intention was to show me how little I wanted mice in my house, but it didn't work because I loudly and adamantly said "mice!" And I meant it. And I still mean it. But if I could really have it my way, I wouldn't have either one. Officially on the to-do list for tomorrow: buy mouse traps and then install them everywhere.

As far as the real point of this post goes, I revisited a previously adjusted project to tweak it for (maybe) the last time. This project originated for our anniversary in July, when I decided to frame the monogrammed letter pictures hubs had gotten when he lived in South Carolina. You know, those cool things where each picture is of an architectural detail that is shot in a way that makes it look like a letter of the alphabet? And then you get the letters in your last name, and they sit in a drawer for lots of years and then one day your wife surprises you with them in a frame for your first anniversary. Except in this case, I put them in a frame that I decided I didn't like once we hung it up. So I painted it white to match the other frames in our room. Unfortunately, this part of the evolution didn't take long, so I didn't bother with a real picture at the time. All I have to show for it is two pictures I took so I could Instagram mid-paint job.


Obviously, this was the first of a couple coats of paint. You can see the wood that the frame originally was, and even though I love wood the shade of it just didn't match the rest of the room. It bothered me, so I painted it to match. Here's what it looked like after the paint:
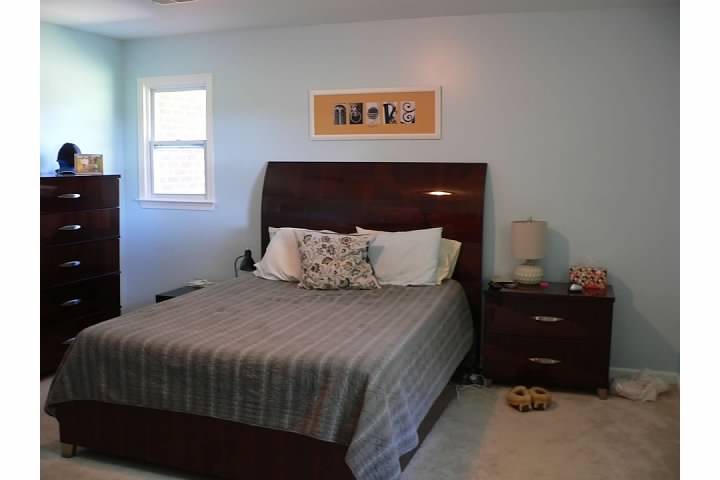


I was super happy with the white frame...but I still wasn't happy. That yellow was just too intense. It was a good idea when I picked it out; yellow was one of our wedding colors which had great sentimental value, and it did look good with both the original frame color and the black and white of the photos. But in the white frame...next to the new wall colors...eh. The blue turned out brighter than I had thought it would, and that yellow was just too intense on top of it. So I decided pretty much three minutes after I hung the newly painted frame that I would do something about that matting...and I decided about half a second after that that it would involve burlap.

I've already posted a couple projects so far that have involved burlap, so I think I should take this moment to explain why, especially since I have many more burlap projects planned. Burlap is kind of a fad right now - if you believe anything you see on Pinterest anyway - and even though I've gotten lots of great ideas from said fad, I like to think I loved it way before the wave hit. I've had my burlap TOMs for at least three years and I wanted them for several before that, so I have a lot of credibility here. Regardless, here are some reasons why I love burlap:

1. It's a neutral color that matches most other colors and therefore fits into most rooms easily
2. It provides a lot of texture to your design palette
3. It's cheap
4. It comes in various forms, so it's easily adaptable to any project depending on what thickness and how tight a weave you choose
5. It's a pretty timeless fabric, so even though it's a fad right now it's not something that's going to be obnoxiously out of style in a couple years
6. It's got a very rustic, rough and country spirit to it
7. Depending on what colors and objects you pair it with, it can very easily embrace different themes or design styles
8. I used a lot of burlap in our wedding decorating so it has a sentimental place in my heart

Because of that list, I see places for burlap everywhere in my home. I've had to dial myself back a little in some of those cases (not every room in my house needs burlap curtains), and I have made lots of notes and mental plans to tackle those projects in other cases. I just love burlap. But back to the evolving personalized picture...

That yellow really needed to be covered. By burlap.

This part of the project wasn't insanely hard to pull off, but it wasn't super easy either. The original matting didn't have those holes cut out; I had to spend a whole lot of time measuring and remeasuring to get the pictures where they needed to be and then I taped them down. So the idea of doing that all over again...with burlap...I wasn't excited.

First: I cut the burlap to size, an inch or so bigger than the original matting on all four sides.


Second: I traced a box where the pictures all are onto the burlap, slightly smaller than the picture to allow for wiggle room and overlap. I didn't want the Sharpie to show when I eventually glued the pictures down onto it. Because the burlap I'm using is such a rough and loose weave, it was really see-through and allowed for easy tracing, as you can see by the picture.


Third: I glued down the burlap to the matting. Because it was so see-through, I was stumped for a couple minutes here. I didn't really want to glue it onto the yellow matting and have it show through, thus defeating the purpose of this entire thing. But instead I glued it to the cardboard back board that came with the frame originally - which is the same color as the burlap so it wasn't obvious - and would use the yellow matting in the back as the back board instead when I put the whole frame back together.

I used that same all-purpose glue again here, which I am a huge fan of.


Fourth, Fifth, and Sixth: Here's where I messed up several times. I had traced the picture placement with the burlap just sitting on top of the original mat, but when I stretched the burlap out to glue it down tight onto the cardboard, the tracings all moved around and didn't stay in logical places. To be honest, I knew this was going to happen, I didn't know how to deal with it so I pretended it wouldn't happen, and it ultimately bit me in the butt. The burlap was secured tightly, but the Sharpie was all wonky and crooked and made for a challenge as far as covering it with the photos. I tried to eye ball it the first time, and they were all crooked and not in a straight line. So I started over, measured with an actual ruler this time, and tweaked their placements and the measurements until they were all in a straight line, all at equal spacing, and all covering up the original Sharpie lines. And I'm telling you, this was no fun. But it happened and it worked, and I love the finished product.


It's so much softer than the yellow, and it also matches the room a lot better. I have a couple burlap items already, but I have plans for a couple other key projects coming at some point. Even though I love a good accent color pop in a room, the yellow just wasn't doing it for me and I am much happier with the burlap. Because the answer to everything, class? That's right. Burlap.

One more before and after:


Yeah, the answer is always burlap.

Sunday, September 8, 2013

Tissue Box Cover

Every once in a while there's a DIY project that just doesn't go too well. I have a lot of these. Even in the most difficult project, though, I usually end up loving it in the end because all that difficulty led to even better ideas that make the project more functional and/or cute in the end. This particular project...I'm still not so sure about. I'm looking at it from across the room right now, and I can honestly say that I'm not sure how it turned out. I guess I'll let you decide. You...and time.

Tissue boxes are ugly. They're not necessarily all ugly, but I think it is a given that you can't count on finding a tissue box that matches your decor every time you go shopping. I wanted to deal with that minor annoyance by creating a tissue box cover, which would fit on top of the tissue box and hide the ugly. This way it would always match and I can be free to buy whatever super ugly tissues just happen to be on sale. This probably seems like an unnecessary DIY project...and it is. I'm pretty sure not too many people care what the tissue box in my living room looks like, but Sunday night football was on and my team lost to that punk Colin Kaepernick earlier this afternoon and I needed a project to keep myself busy. Because I'm really mad about that punk Colin Kaepernick.

Here's the tissue box I started out with.


The irony of this post is that this tissue box actually does match the room its in. But oh well. That wasn't really the point I suppose.

I decided the easiest way to make this box would be to use cardboard. Lucky for me we just got a piece of furniture that came in a large box, giving me enough cardboard to make 30 tissue box covers if I wanted.


First step: I measured the sides of tissue box, and added a half-inch to each measurement so the new cardboard box would fit around it. The top and two long sides are the same size (my measurements were 9.5"x5"), and then the short sides are obviously smaller (my measurements were 5"x5").


Second step: measure, draw, and cut out the hole for the tissues on the top piece. I'm the opposite of a mathematical, so this was not a very specific or concrete process. It involved some measuring and some eyeballing, but it worked out fine.


Third step: tape all the sides together. It's just a tissue box and won't be put through war or anything like that, so I just used scotch tape. It's a little fragile while you're going through the next several steps but it holds well enough for it's long-term purpose.


Fourth step: cover the cardboard with the fabric of your choice. I chose burlap, because it's kind of my goal to cover, upholster, and drape everything in my house with burlap. I still love it as a fabric, but I will now confidently say that it's a pain in the butt to work with. I mean...good grief.

I figured the best course of action for covering the box would be to wrap it like a present, even though I knew at some point there would be issues because this particular box is missing a side.


I used my good ol' all-purpose glue to attach the burlap to the box, but in hindsight I should have just used my hot glue gun. I was feeling lazy and didn't want to bother with it, but the burlap would have been easier to deal with and manhandle if I had used the hot glue gun. Next time.


I didn't really have any issues until I got to the corners. I continued to try to wrap it like a present, but the burlap is just too thick and the glue just isn't strong enough. The combination of the two was a bust.


That corner fold was like two inches thick, and mostly an air bubble. I needed to do something different. So I made some cuts and tried again.


I cut along each crease so I had four square flaps hanging off the ends of the box, then glued down the top and bottom two flaps, then cut the side flaps into triangles and glued them down. And by this time I was praying that my craft glue would dry clear, since it was a hot mess and smeared all over the place from my multiple attempts and mistakes. Even though it looks a little rough in this picture, it does actually look much better in person and a whole lot better than the original attempt.

Fifth step: Cut the extra fabric off the bottom of the box.


I will be honest here: I tried to glue that burlap down onto the insides of the box to keep it all clean and neat, but it didn't seem to want to stick all of a sudden, and I was getting tired. So I just slid the whole thing down over the tissue box with the burlap tucked inside, and it worked. So I chose the lazy route once more and left it.

Sixth step: cut the hole in the top of the burlap to poke the tissue out.


A little rough around the edges...not the most beautiful thing I've ever made...but overall not too horrible. I think it's better than the original.


Because I know you're dying to know: yes. The glue dried clear after all (not according to this picture, but as I'm typing right now I can't see the glue through the burlap anymore).

Like I said, not the most beautiful thing I've ever made, but it does its job and it's growing on me the longer it sits there. If I make more for other rooms in the house (my nightstand currently has a horrible hot pink tissue box), I'll use my hot glue gun and I'll know how better to start out folding the edges. Overall, I think it's cute and I'm glad I got something else crossed off my list.

Tuesday, September 3, 2013

The Jewelry Board, the Valuable DIY Lesson in Patience

So, sometimes things look ridiculously easy to accomplish when you're looking at a picture on Pinterest. Sometimes it's because it actually is that easy, and sometimes it's because Pinterest lies to you. And yet there are other times, the most frustrating of times, when it should be as easy as it looks...and yet it still kicks your butt. This was one of those. And honestly, I'm being dramatic. It didn't kick my butt that bad. It just seemed like it did because it stretched out over several days and various shopping trips.

We've all seen a thousand examples of how to better organize and style your jewelry on Pinterest, and they're all adorable and guaranteed to make your closet prettier. I finally decided to make mine happen, and even though I wanted it to be the most adorable thing ever, I had to continue to remind myself that it's going to be hanging in my closet. The closet that's the part of my bedroom that no one sees, and the bedroom that's the room of my house that no one sees. So...perfection really isn't entirely necessary. Really and truly, that's key. Don't let Pinterest get in your head. Don't do it.

The backbone of this particular jewelry board is a bulletin board, which I found at a thrift store for $3. It was a little beat up around the edges but basically in perfect shape. And it's kind of huge, as far as $3 bulletin boards go.


First step: paint the frame white. 


Second step: cut the burlap to size.


Third step: create the border. I used white thumbtacks, which was doubly great because it was how I attached the burlap to the board and also created an additional border and detail. Here's the thing though...it was so much less of a neat and tidy process than I imagined it would be. The tacks were nearly impossible to figure out how to space perfectly so they're crooked and bunched and overlapping, and you know what? It's okay. Because where is this getting hung? In my closet. That's right.


Here was where the first opportunity to practice some patience came in. I didn't buy enough tacks, because I severely underestimated how big this thing is and how small the tacks are. So I had to spend half a movie staring at my unfinished border from across the room one night, but oh well.

Fourth step: lace. This is to hang the earrings from, and I have to say I was pretty ridiculously proud of myself when I thought of it. Partly because it's really functional and partly because it's super pretty.


Fifth step: add some support for that lace. It's just way too long a stretch and the lace is too thin and flimsy to support earrings hanging from it. So I measured it out and added the extra tacks.


Sixth step: try a million different ways to get the beads to stick to the stinking thumbtacks.

Most of the Pinterest examples I've seen involved knobs of some kind for the necklaces. I didn't feel like spending money on knobs, and I also felt stumped about how to attach them to the actual board. So I decided to make my own. I found big round turquoise beads real cheap and on clearance at Walmart, and thought they'd be perfect to glue onto some of the leftover thumbtacks. It was a great idea, it just took lots of trials and several nights to make it work. I tried craft glue first, and got super excited about it because I assumed it would work.


I mean, it does say "all purpose," after all.

I thought we were all systems a go until I stood the board up and tried to hang a necklace. And they all started to fall.


So that didn't work. I tried the super glue that was in the garage. But it was super glued to the insides of the bottle and wouldn't come out. So I thought I'd use the Lock-Tite that was also in the garage, but not only is it not a glue at all...it's also apparently pretty expensive. So I wouldn't recommend that option for all kinds of reasons.


I almost gave up and bought the stupid knobs but hubs encouraged me to get some new super glue and try that option for real. So I did, and it worked. Praise the Lord for super glue.

Seventh step: attach the box. At some point during this process it occurred to me: rings. I don't have anywhere to put my rings.  I had an extra drawer organizing box laying around with no purpose, so I painted it and glued it onto the edge of the board with that all purpose craft glue. Because even though it doesn't work well for beads and metal thumbtacks, it's awesome with wood.


Eighth step: measure out where the "knobs" will go. You might have noticed in the picture above that I didn't necessarily make the knobs perfect when I hung them the first time. I was stuck on the "it's going in my closet" concept and just kind of eyeballed it. And when I was given the chance to do them again, I figured that I could handle making them straight and even. It is going in my closet, but I do still have to look at it.


I drew a dot every inch along the entire length of the board, which left me with eight more dots than knobs. So I spaced them out accordingly, put in some plain thumbtacks as space fillers, and there you have it.


These pictures turned out really dark, which I don't understand because I'm not much of an expert when it comes to my camera. But there's the finished product. The knobs work, the lace works, the box holds not only my rings but the two bracelets that I own as well.

The cons are that there are two necklaces that don't fit on the board because they're just too chunky. Someday soon I'll come up with a solution for them. I also don't have a space on this board for my nice pearl earrings that I keep in the box, but I have a drawer I can easily keep them in. The rings are a bit of a mess in there in that box - as opposed to a jewelry box with the organizers, but I honestly don't wear my rings too often and I'm okay with them being like that.


Overall, I'm a fan. And I really really love burlap. I'm kind of obsessed with it, actually, so I love that I got to use it. It's not perfect, but I'm happy with how it turned out. So there, Pinterest.