Showing posts with label Paint. Show all posts

Tuesday, February 24, 2015

Basement Stage 1: Completed

We've been picking away at our basement facelift for a couple of months now, and as of Sunday night we have finally reached a good stopping point for a while. Praise. The. Lord. JT's aching body and my grumpy need for husband quality time have both been suffering.

As a reminder, we installed the wood stove down in the very unfinished basement, and then found ourselves in a situation where the things we should do to help the efficiency of the stove turned into a whole bunch of "well while we're doing that we might as well do this too." To keep things somewhat realistic, we've decided on a moderately long term goal of pseudo-finishing the basement within the next couple years, with the bulk of it probably being done over the course of this year. Stage 1 (meaning, the stuff we're going to do right now) is officially done.

This is what we started with. I wish so much that I had better before pictures, but I tend to get excited and jump right into things without capturing the originals very well. I'm trying to work on that though.


This is a tiny little slice of our whole basement, but it does do its job in showing what the walls looked like and what the ceiling looked like. This was our basement for the last year and a half of us living here; it was a little creepy and very dirty and we never went down there. I shared in the initial basement facelift post and the last basement update post that JT had spent a considerable amount of time DRYLOKing the walls and then spraying Kilz on all the walls and ceiling rafters. He also insulated all of the windows and crawl space entrances. Here is what the basement looked like when that was done.


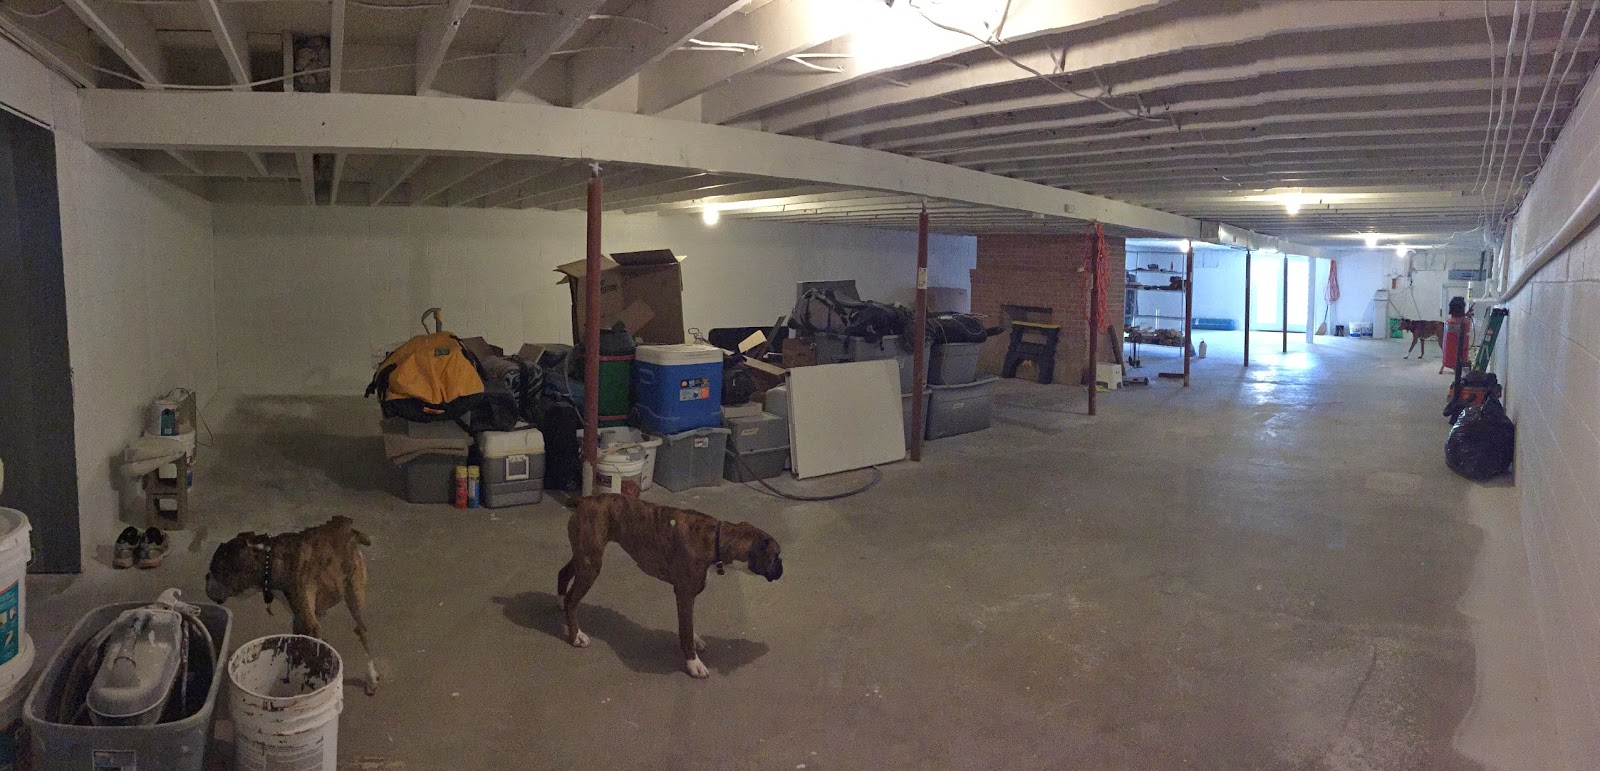
Just to give you your bearings: the entrance to the basement from the rest of the house is the doorway at the left of the picture, and the outdoor entrance is at the far right. The wood stove is on the other side of the brick fireplace you see in the middle of the room.


This is the part of the basement that we spent this weekend working on. You may notice that the ceiling is lower on the right side of the picture, which is because the book room upstairs has a step down into it. The ceiling is too low in that space to legally finish it, so we decided it would be a nice big storage area for all that junk you see piled up in the middle of the room. Our plan was to line the back wall with shelves, which meant buying a whole bunch of wood.


And then transporting them all downstairs with an incredibly advanced system.


Then JT just spent the first half of the day cutting, and the second half of the day forming the frame. We used these plans (with some adjustments, but I couldn't tell you what those adjustments were because it's all JT at that point).


First he built the vertical supports, then he built up the boxes that would be the shelves' supports.


And then it was just a matter of screwing everything together (again, I say this like it was easy peasy and like I was the one doing it. I did help hold some things, but Charlotte refused to be happy Saturday so it was almost entirely JT).


Beautiful, aren't they? That was Saturday night's stopping point, and Sunday we ripped down the plywood and JT installed it all for the shelves' bases. And then we had the pleasant experience of going through that massive pile of stuff to weed out garbage, make a donate pile, and reorganize in a more logical way. Not to mention that all of it (ALL of it) was coated in paint dust from the sprayer, even though it was under a tarp the whole time. But in the end, this is what we have.


Looks good, doesn't it? The white brightens up the whole room so much, and the shelves are a dream. It's so much better than the pile in the middle of the room. (Don't mind that huge puddle of spilled paint in the middle of the floor. It's always good to make sure your spouse hears you when you ask them to tighten the lid on the 5 gallon bucket of paint.)


And you might notice that the red support poles are now white! It took four coats but thankfully it was a super quick process and they look so much better now! The paint on the floor and around the poles isn't an issue because on our list to get done sometime this year is to paint the whole floor. So no worries there.

We're stoked about the changes that have already happened in the basement, and we're excited about the rest of the changes that will take place over the course of the year (and longer). One thing on the list that is pretty awesome is that we will wall in the storage room and line the rest of the walls with more of the same shelves. Can you even imagine? I'm already dreaming of all the stocking up I can do...I may be able to avoid Costco for six months! ;)

Here's our basement to-do list as it looks right now (long term and short term):
  • insulate rafters and paint over them
  • paint the red support posts white
  • build shelves for storage space and organize everything that's under that huge tarp
  • paint the floor (later in the year)
  • put walls up to conceal the storage area (maybe by the end of the year/next winter sometime)
  • install more shelves in the concealed storage area (end of the year/next winter)
  • put in a bathroom (long term plans)
  • sheet rock ceiling (long term plans)
  • sheet rock and insulation on walls (long term plans)
  • install outlets throughout the basement (long term plans)
  • furnish the rooms (long term plans)
So we do have a long way to go still, but I'm glad we will be picking away at it over time. There are still those handful of things that we would love to get done at some point this year, but nothing really seems to be an emergency any more and we can leisurely cross them off the list. Fingers crossed, but the next big project for our list is, as of right now, my dining room table and various kitchen accessories! My fingers are crossed REAL hard for this, because I. Can't. Wait. for my table. I left the plastic fold-up table out for weeks after Thanksgiving instead of putting it away because I just loved pretending I had my big farmhouse table already. And it's looking very promising that we should be building it in May!


Friday, February 20, 2015

Basement Update

Last time I showed you pictures of the basement mini-reno, JT had just finished painting the walls but everything was still a mess down there. Since then, he has spent an incredible amount of time insulating the ends of the rafters, sealing a few more drafts we discovered (seriously...how can there be so many drafts?), painting over all the new insulation, and cleaning everything up. And now the pictures are much more dramatic.

Just as a reminder, here is a (kind of bad) picture of what we started with:


And this is what we had last time:


And this is what we have now:


Looks pretty good, right? JT has killed himself (almost but not quite literally) on this basement so far, and I think we're both pretty stoked the light at the end of the tunnel is getting closer. Just for giggles, here are some close ups of the insulation JT installed to try to help with drafts.


Do you see the space in between each rafter, and how there is now insulation filling each space? It's hard to see because he also painted over each piece to make it less noticeable. Honestly, guys, we have a lot of rafters and that's a lot of spaces to fill. He cut each piece of insulation separately to size, stapled them all in place, and then painted them all. All the way around the whole  basement. He also covered both crawl space holes with fresh insulation and all three mini windows with insulation and painted over all of them as well.


 That's one of the crawl space holes filled in.

It all looks so good and clean! And not even slightly creepy like it was originally. You may notice that there's paint on the floor from when he sprayed the walls, but that's okay because painting the floor is in the middle-long term plan. Next up on the list is building a massive amount of shelves for the storage area and going through/organizing that massive pile of stuff that's sitting in the middle of the room. I'm not necessarily looking forward to that process, but I'm SUPER excited for the finished product.

Here's the basement progress so far:

  • insulate rafters and paint over them
  • paint the red support posts white (soon)
  • build shelves for storage space and organize everything that's under that huge tarp (soon)
  • paint the floor (later in the year)
  • (maybe) move the treadmill downstairs (later in the year)
  • put walls up to conceal the storage area (maybe by the end of the year/next winter sometime)
It still looks like a lot on that list, but they should all be relatively quick and easy (famous. last. words.). Unless this predicted snow gets in the way, wood should be purchased for the shelves this weekend and we will knock those out before JT starts his class in March and becomes, in his words, "useless" for a while. 

Monday, February 9, 2015

A Basement Facelift

Some of you that are homeowners are aware of the phenomenon that is the snowball effect: you fix and/or add one thing and decide "well since we're doing this we might as well cross this thing off the list too, and if we're going to do those things we really should get this done first, and then we might as well do this too..." and suddenly you're chin-deep in a project and the only way out is to just get it done (and spend much more money than you ever anticipated for that initial tiny addition). Friends, welcome to our basement.

As far as unfinished basements go, it's quite large. 1,800 square feet, in fact. It's really handy because all the junk we didn't feel like going through and cleaning out when we moved could just be tossed down there and not really dealt with because I wasn't having to find homes for it. We always knew we would build shelves to store all that junk, and we always imagined finishing it in the faaaar off future. It just wasn't a priority because it didn't need to be, and honestly we had more than enough keeping us busy upstairs. But then we installed a wood burning stove in the basement to supplement the heat pump and help offset some cost. When we had the first couple truly frigid days we realized how much air was coming into the basement through various drafts and cracks (and therefore fighting the work of the stove), so we sealed them all up. (Who am I kidding? We didn't do anything. JT did 99% of everything that has been done so far.) When we realized that a ton of moisture was coming in through the bare cinder blocks, though, it was time to do the horrible task of DRYLOKing all those walls. This stuff is super expensive and super thick. It goes on like mud, it must be hand-applied because it's too thick to be sprayed, and the bare cinder block sucks it up like a sponge so good luck doing anything less than two coats. JT spent a lot of time doing this. A LOT. I helped one afternoon when Charlotte actually napped for a significant chunk of time but other than that JT was down there all by himself.

I don't have much in the ways of a "before" picture (typical) but I do have this:


Here you can see the wood stove, the metal rack we've been storing wood on, and most importantly the bare cinder blocks. Here are some shots of the progress with the DRYLOK:


It's not much, I know, but you can see that the walls are white and that it's a pretty dramatic difference. I knew that even though we were doing this for a very practical reason, painting the walls white would also really lighten up the whole basement. I was excited for the dingy, dark, and moderately scary basement to be freshened and cleaned up a little bit. The next part of the snowball effect helped take that whole concept to a new level: JT was looking up at the basement ceiling one day and mentioned that those beams are 40 years old, and have 40 years of who knows what all over them and growing on them. He suggested we borrow a friend's sprayer and paint the ceiling with Kilz to go ahead and just kill whatever funk is on it. Since the cinder blocks had kind of sucked up the second coat of the DRYLOK as well and there was no way we were paying for enough paint for a third coat just so it would look good, we decided to actually spray the walls and ceiling with Kilz to even things out visually as well as just make sure we were cleaning everything up. 

This kind of killed me, I'm not going to lie. I love those rafters and beams; they're cedar, for crying out loud. Who builds houses with cedar? People in the 1970s, I suppose. They were so pretty and cool, but they were also kind of funky and I knew they would look good white too. So, JT once again got back to work and sprayed everything. And here's the current state of our basement:


I know it's still not all that pretty, but it looks great compared to what it did. And we also know what's to come, which means that having it painted is such a great first step (that was like a month in the making). Speaking of what's to come...we originally hadn't planned on even touching this basement for many many years, and then we decided to jump head first into it and just do it all, and we've now settled on kind of a happy medium. Here's what's to come for our basement, with a rough schedule:

  • paint the red support posts white (soon)
  • build shelves for storage space and organize everything that's under that huge tarp (soon)
  • paint the floor (later in the year)
  • move the treadmill downstairs (later in the year)
  • put walls up to conceal the storage area (maybe by the end of the year/next winter sometime)
So that's the loose plan. We had originally thought we'd just cruise right to area rugs and furniture and a television, making it just a couple of simple steps away from being finished. But since our only child is 4 months old and isn't in desperate need of a teenage hangout just yet, and since the upstairs of our house is 100% more than enough for us to live in, and since there are about a hundred other things we'd rather get started on in the house, we're tabling that thought for now. The shelves and the floor are still big ones, and we plan to do them this year but if not it certainly won't be a big deal. This has been an incredible amount of time and money invested to make it look like this, and even though it might not be too impressive in pictures we're more than pleased with the difference it makes. (And so does our wood stove, who doesn't have to work nearly as hard anymore.)


Wednesday, June 18, 2014

Deck Reno Stage 1, Part 2

Friends, family, strangers: this latest project I'm about to share with you absolutely sucked. I officially did not enjoy it. The majority of it was done in 90+ degree heat and lovely Virginia humidity; I thought it would take a long weekend but instead it took 26 days; I thought I'd be able to happily and blissfully use a roller but only a paint brush would do the trick. It was unpleasant, it was not what I bargained for, but it has definitely been worth it. (And I can say that now, now that it's done.)

I shared Part 1 of our Stage 1 deck renovation about a month ago, showing the befores and afters of our built in flower boxes. Part 2, painting the deck, started at the same time but just took a whole lot longer. I explained last time that we have had strong negative feelings towards our deck since day 1, and were planning on replacing it next summer with Trex decking and a whole new layout, but after another glance at the prices we had to be honest with ourselves and put it off a couple more years. But we did think that painting the deck in the meantime would be the way to go, both to make it look a little bit prettier and to stretch its life a couple more years. When we saw Behr's Deck Over at Home Depot, we figured that was the obvious way to go. It's actually intended to make your wood look like Trex, filling in cracks and smoothing out the rough surfaces, so we thought it would be a nice trial run. We picked colors that matched what we were imagining for the actual deck renovation so we could see if we liked them, and got to work.

First, though, here are some before shots.


Because the wood has been exposed to the elements for who knows how long without any kind of stain or paint, there's a lot of chipping, chunks missing, cracks, and mold stains everywhere. Here's a shot of one of the worst hand rails.


One of my least favorite features of the deck is the weird and sudden slant in the floorboards halfway down the length of it. Our guess is that whoever built the deck just didn't measure very well and when one end of the deck met the other end they realized the floorboards didn't match up and they just did a little slant to make them meet up...and to make you trip every time. You really can't even see it if you're walking towards it, so it's a real killer. Just terrible design all around.


Despite being ugly, it's just not a very welcoming part of our house. The wood was too rough and splintery to walk across without shoes, you don't want to lean on or touch the hand railings, and the whole thing just feels dirty. Painting it seemed like the best way to give the whole space some new life and buy us some time.

The first step was to power wash the deck. Behr sells a cleaning product designed to be put down before the Deck Over, but it specifically said no to use it on unstained wood and since you can see that our deck is very much unstained so we decided to just power wash it instead.


My parents were generous enough to give us their old power washer when they purchased a new one this year, which I have to admit gave me some mixed feelings since on the one hand it was one less thing to have to buy for ourselves but on the other hand gave me flashback tremors of all the summers I had to power wash my parents' house, shed, and workshop. But in any case, it was extremely helpful.


It didn't really take all that long to clean the whole deck and railings; it was so long ago I can't remember for sure but if I had to guess I would say about three hours. If you've never power washed old wood and seen the difference it can make, it's pretty incredible. Here's a before, a during, and an after shot of that really bad hand railing I showed earlier.


What you have to be careful about with power washing wood, though, is that if you don't cover it with new stain or paint as soon as it dries, you're actually just opening the wood up to more mold and damage from the elements. Since we knew we'd immediately be painting, we weren't too concerned about that.

One other quick step we had to accomplish was to secure the railings a little bit more firmly. They were very wobbly, and you didn't necessarily feel too safe leaning up against them. We used some simple L brackets to secure them to the deck floorboards. They're very solid now, and even though the hubs was kind of bummed about how ugly this particular solution is, we planned on just painting over them and crossing our fingers that they would blend in somewhat. 

 
Once the prepping of the project was done, we waited for it to dry (almost no time at all in this crazy heat, let's be serious) and then started painting. We started with the railings; we used a different color on the floorboards and didn't want to have to worry about drips or mistakes while painting one color over another finished color. If we had drips or spills on this deck the way we did it, we just painted over it later with the floorboard color.

I had big dreams of using a small roller to paint all the spindles on the railings, since the spindles are gloriously square instead of cylindrical. After about twelve seconds of attempting to roll, though, we realized it just wasn't going on thick enough to fill any of the cracks and we'd have to brush it all. Such a bummer, guys. Those railings took forEVER, and when we rolled the floorboards several days later and discovered that that wasn't filling any cracks either it was an even bigger bummer.

Here's a shot of the difference between the first, rolled on coat and the second, brushed on coat (the rolled is on the left and the brushed is on the right).


You're able to just put it on so much thicker with the brush, and the cracks are actually filled instead of highlighted by the paint around them. It took forever, but it just made way too much of a difference to not take the time and do it right. 

All total, we did one thick brushed coat on the railings, one rolled coat on the floorboards and one thick brushed coat on the floorboards. Hence why it took so long. Are you aware of how much surface area a deck is made up of? So much more than you'd think. Behr does recommend two coats on everything, but it went on the railings so thick and covered so well we felt confident about our decision to save us some time and pain (and money) by just doing the one. The floorboards get the most wear and tear anyway, so that made more sense to do the two coats there.

Now that it's all done, here are some after shots.


You might have noticed that we chose to paint the tops of the hand railings in the same grey/blue color of the floorboards. We went back and forth over what color to paint them, but in the end decided to do the darker color because people's hands would potentially make the white dirty. We love the end result, and think it definitely has done its intended job of making the whole space more attractive while also giving the deck some protection for the next couple years. Now that we've done it, though, we've learned a couple things:
  • The grey/blue color is not at all what we thought it would be. We like it, but we had been picturing much more of a darker grey/muddy brown color. When we get the Trex decking done we will pursue a color more like that. 
  • The color of the floorboards, aside from being different than we'd pictured, is entirely too light for function. IE: it rained and the dogs walked through the yard and then walked across the deck in their slightly muddy feet and stained the deck. Like, permanently and actually stained it. Just like that. We scrubbed it with a microfiber rag, and the hubs even got the power washer back out and tried that, and those footprints are here to stay. And they're kind of everywhere. It's a little bit deflating...but it's also a temporary solution and we know that. I'm keeping it all in perspective. Because I suppose there are worse things in life than muddy footprints. But again: in the future we will definitely be pursuing a darker, muddier color that will hide their footprints. 
Overall, we're very excited with the end result. It's so much better than what was there, and it's been a great learning experience. All total, we ended up having to get 3 one-gallon cans of the white paint and 1 five-gallon can of the grey/blue paint, totally about $300. It's still a chunk of change, but much less than a whole new Trex deck so we see it as a good investment for the next couple years.

Now that that's done and crossed off the list, here's the updated to-do list for outside:

-trim all bushes and trees on back property line
-trim bushes in front yard
-dig out drainage ditch in front yard
-replace shed
-paint trim on back door
-repaint back door
-hose holder in front yard
-hose and hose holder by back door
-black barn trim pieces for garage door
-relandscape front beds
-tree in front yard
-rock beds with landscaping around back of house
-fix fence
-power wash fence
-repaint fence
-plant flowers in deck flower boxes
-fix up wood storage area on deck
-build new wood storage/barn
-organize new shed
-reorganize garage
-move storage unit from garage to shed
-clean deck wood
-repaint deck and railings
-lattice under decking
-build garbage can storage
-level off shed's ramp
-paint shed's ramp
-bury drainage pipe in front yard
-new shed for bikes?
-driveway redirect of driveway to bike shed?

Eventually:
-new deck
-lattice under decking?
-new furniture for deck
-build permanent fire pit
-roof over portion of new deck


Monday, May 19, 2014

Painting's my favorite.

I've said it so many times and I'm sure I'll say it again: paint is the easiest, most dramatic, and usually the cheapest change you can make to update a room. My favorite kind of painting updates involve using extra paint we already have stored in our basement from previous projects.

I painted the laundry room/mud room quite a long time ago, using leftover paint from previous projects.


Originally, the whole room was just white. I painted most of it a dark grey (originally used in the guest room) and two accent walls in the laundry space a minty green (originally used in the book room). It was a stellar idea, and changed the whole huge weird room in a pretty incredible way. But unfortunately I can't find a picture of it in that state. I really thought I had taken one, and I in fact have a memory of taking one, but I cannot for the life of me find the picture. But for your ability to kind of picture this strange space, here's a kind of sort of shot.


I honestly don't know why this picture was even taken, but imagine that almost all the walls surrounding that grey one are also grey. (And the wood has been painted white.) Everything in this whole room have been that dark grey with the exception of the wall right behind the washer and dryer that you would see through that window cut out. I painted that wall the minty green, and it was supposed to be a cool accent wall that popped out and helped define the laundry space as different. Except...and you have to keep imagining now...it didn't really pop at all. It was such a faint color next to such a dark color that it just looked like I forgot to paint a wall. And it's bothered me ever since. A while ago it hit me that maybe I could repaint the whole laundry space, this time with a brighter blue left over from our bedroom, and that this time I could include the other wall that the slop sink and mirror are on too. That way it would define the space even better by including more walls, and the color is a little bit brighter and would therefore give me more of that pop I was looking for.

Because I have other plans for the laundry room (see to-do list at the bottom of this post) I figured I'd wait and do it all at once. But like I've mentioned several times...my husband is out of town on business and I have been on the hunt for things/projects to keep me busy. Busy and distracted and productive. The laundry room seemed to be a logical thing to attack...or at least start attacking. I still can't do much about the rest of that to-do list right now, but painting I can do. My brother came up to help me prime the back grey wall - no primer for this pregnant lady - and then after he left I painted all three walls. And even though pictures don't capture it too well, I'm kind of crazy about the change it all made.


I know it looks more white than blue in all of these pictures...which really annoys me, but I'm not even close to a professional photographer and none of the pictures I've ever taken of the inside of my house actually look like my house so I've learned to roll with it. But in person it's less subtle and does work with the dark grey walls, the white sink and trim, and the grey appliances.  The whole space does look a lot crisper, cleaner, and separated from the rest of the strange mud room/entryway/dog feeding area. And when you walk through the kitchen and through the path to the garage - which has become the main route in and out of our house now - you see both of those walls painted the same bright blue instead of the odd singular accent wall from before that made me think "that was a mistake" every single time.


Horrible photo quality (our ceiling looks green?) but hey, the whole laundry space is painted a color that works and if you want to really believe me, come visit me. I'll show you in person.

You live and learn, and paint is the super easiest of all things to change. Seriously. Don't be intimidated by painting walls. I'll say it one more time: it's such an easy and cheap way to change the entire mood of a room.

So now that that's crossed off the list, here's our laundry room to-do list:

  • prime grey wall
  • paint accent walls blue
  • cabinet(s) above washer and dryer
  • hanging bar above washer and dryer
  • shelf behind counter top
  • organize under the sink
  • new ceiling light
  • rug?
  • tile back splash around sink?
It's a small list, which is exciting, but have you seen the cost of single cabinets? I mean, my goodness. Who are they kidding? So although it's the kind of thing that won't crush us financially or anything, it's definitely something that has been and will probably continue to be put off till the right time. So we shall see, but for now, the painted walls are making me happy.